Friday, March 29, 2013

Update The SolydX System

The description from SolydXK forum :

Short description
SolydXK uses update packs to update the SolydX and SolydK systems at your home, organisation or company. These update packs are necessary to keep your system up-to-date and secure without jeapordising the stability of your system.

Debian, by default, is a “rolling” distribution: its repositories are continuously changing which means you get system updates regularly. However, each update introduces a potential risk to your system.

This is why SolydXK has introduced the Update Pack (UP) method to manage the way updates are brought to the users of SolydX and SolydK. 

The UP Process explained
SolydXK increases stability and security by testing the incoming packages before they are released. To guarantee up-to-date security, the SolydXK Security repository is updated on a daily bases, and therefor the SolydXK security repository is not included in the UP process.

On the first of each month, the SolydXK Testing repository is synchronized with the Debian repository. To further increase security both Firefox and Thunderbird are being built from source if there is a new version available.
The SolydXK testing team will test the Update Packs for the next five days on breakages and security risks.

If testing breaks, the testing process is stopped until the next month. This is then communicated to the SolydX and SolydK users stating the reason and a description of the rest of the process. 

When the update manager show this icon on the system tray, it means there's an update available at the repository, click to open the update manager windows.

The update manager automatically starts to download the package information from the repository.
It will recommend to update itself before updating the rest of the system.

Click the install updates icon.
Downloading the package files.
New updates are available. To view information about an update, just click the update pack info icon.
The update pack info.
Click the install updates icon, and the update manager will start to download the package files.
After all the process, the update manager will close itself and there will be "your system is up to date" pop up when you hover your mouse on it.

And this is the end of the update process until next updates are available at the repository.

SolydX Enable PAE System

PAE or Physical Address Extension is a feature allowing 32-bit processors to access physical address space larger than 4 gigabytes.

Why not 64-bit instead?
For me, a 64-bit operating system use more RAM and CPU. In other words, a 64-bit operating system use more resources than a 32-bit operating system. Besides, my RAM is less than 4 gigabytes.

If the RAM is less than 4 gigbytes, why need PAE system?
The answer is, multi-core processors.


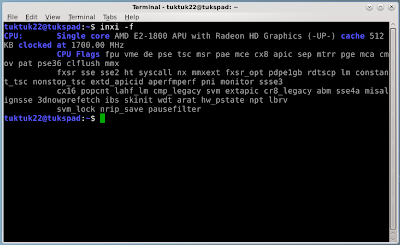
The 3.2.0-4.486 kernel detects only a single-core processor on the system. The system is less snappy because of this.

Only single-core processor is detected with non PAE system.

Then, how to enable PAE system?

We can browse and search the PAE kernel and choose which one you want to install. But instead of using synaptic, we can use Device Driver Manager.

Navigate to Menu - setting -Device Driver Manager.
The DDM detects multi-core system running single-core kernel.
Click the Kernel (if your system is capable of running PAE then the Alternate drivers is here), and tick the linux-headers-3.2.0-4-686-pae

Click yes and wait the download and installation process.

reboot your system.

The system now detected dual-core cpu.

Wednesday, March 27, 2013

USB Modem on SolydX

Instead of gnome-network-manager, SolydX is bundled with Wicd-network-manager. It is said to be lighter than the gnome-network-manager.

Unfortunately, Wicd-network-manager cannot detect USB modem plugged in the machine, so the user using USB modem for connection, gnome-network-manager is more suitable since it can detect the USB modem plugged in.

Laptop user having wireless connection is simply need to find Internet connection somewhere else to download the gnome-network-manager applet from the repository using synaptic package manager.


Connect into wireless network using Wicd.
Open menu - settings - synaptic package manager.

find gnome-network-manager, right click and choose mark for installation then click apply.

The download and installation information process are shown here.
And the installation process is done.
Open the gnome-network-manager.

Add your broadband connection and configure it through the wizard.
And done.
To stop the wicd running at startup, click menu-settings-session and startup then uncheck wicd-network-manager tray and reboot.


For desktop PC that doesn't have any wireless connection, the .deb package can be downloaded from another PC that already has an internet connection at http://debian.solydxk.com/production/pool/main/ and install it with the command sudo dpkg -i *.deb . Here is the list of all dependencies package :


Tuesday, March 26, 2013

How To Install SolydXK Distribution

After the partition of HDD is done and the installation media has been set up, we are ready to install linux into your PC or Laptop. If you haven't done any of those steps above, you can read them here:


To install SolydX, boot your machine to the installation media either USB or DVD media and wait until the live session is ready.

Click the install icon at the desktop.

Select language and click forward.
Select your timezone/region and click forward.
Select the keyboard layout and click forward.
No need to put picture here. Unless you want to put your own photo or you have another picture saved, you just only have the default picture as a choice. Write your name, user name, password and the host name and click forward.
Select the harddisk you want to install SolydX into. In most cases is /dev/hda.
The picture shows the /dev/hda is my local hdd, and /dev/hdb is my usb hdd as an installation media.
Click forward.
If you never install linux before and have done the Setting Up The Partition Under Windows step, you should see unallocated list with size equal to the list shown at disk management software on Windows.
Right click the unallocated and select new from the menu.
Create new partition with linux-swap file system from the dropdown menu with the size twice your ram. If you have 1 Gb ram at least you create 2 Gb of linux-swap file system.
Create an ext4 for the rest of the unallocated hdd.
Right click the new partition and choose edit.
Set the mount point to swap-area for the swap partition and / for the ext4 partition.
Check the Install GRUB and make sure no number is selected on /dev/hda.
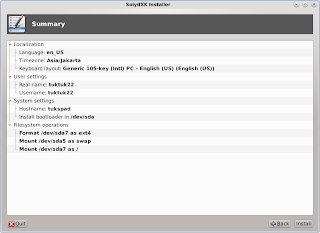
Click Forward and The Summary installer windows will appear. Click install.

 The installation progress should take 15-30 minutes.

After it finished, reboot your machine and let it boot from your hard drive.

Enjoy your SolydX OS ^^

Friday, March 22, 2013

Preparing The Linux Installation Media

Assume you have finished downloading the .iso installation of your favorite linux distribution, the next step is to prepare the installation media using the CD/DVD or USB Flashdisk.

Using a CD/DVD

First, browse the file directory using Explorer

Right click on the file, choose open with and select Windows Disc Image Burner . . .

Insert the the blank CD into the DVD Drive (you may need a DVD instead of CD if the .iso file is larger than 700 Mb) and wait until the burn process is complete.


Using USB FLashdisk/External HDD

If your machine supports booting from USB, then you can use USB Flashdisk or an external HDD as installation media. 

For example here, we use Universal USB Installer and an external HDD. 
First download Universal USB Installer from their website

Click the file.
A License Agreement pop up will open
Click I Agree
The setup windows. Step 1 : select your linux distribution, if it is not at the list, you may select Try Unlisted Linux ISO.
 browse your linux iso files and select the USB drive. To avoid problem, click the format check box.

Caution : this will erase all data saved at USB Flashdisk. Back it up before the process begins.

Click Yes and move to the next step.
The iso file is being dump into the USB Flashdisk.
And the installation is done. Click Close and your USB Flashdisk is ready to be used to install Linux Operating System.