Thursday, April 18, 2013

SolydXK - Where is my Google Search Engine

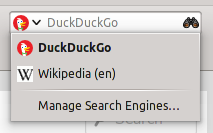
SolydXK is shipped with DuckDuckGo as the default search engine in Firefox Web Browser.

According to Wikipedia, DuckDuckGo is an Internet search engine that uses information from crowdsourced websites such as Wikipedia to obtain its results. The search engine policy says that it protects privacy, and does not record user information.[1] Because users are not profiled, the "filter bubble" can be avoided, with all users being shown the same search results for a given search term.


If you had been using Windows for a long time, you would be more familiar with Google Search Engine.

How to make Google as default search engine instead of DuckDuckGo?

To change the default search engine, first go to http://www.linuxmint.com/searchengines.php

Scroll down until "Commercial Engines" section appears and click the google icon. Clicking it will open a new page.
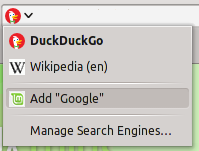
After the page is fully loaded, click the DuckDuckGo icon on the search field located at the right top of the firefox window. A drop down list will appear with new option Add "Google".

Click Add "Google" option to change default search engine into Google.


or.....
you can go to mozilla add-on page here and click add to firefox.


The next step is to change the default search engine when a new tab is opened.

open a new tab and type about:config.

A warning dialog box will appear.
i promise i'll be careful!

Search for "keyword.URL" entry on the search box.
Right click the keyword.URL and click Modify.

Enter
http://www.google.com/search?q=
and click OK.

To recheck what has been edited, open a new tab and just type anything.
For example here, type "test" and hit enter.
and you are good to go.

Wednesday, April 17, 2013

The SolydK Desktop


When you first boot into SolydK fresh installation, the system will prompt a login screen to enter the login password and your username.

The SolydK Desktop will then appear. The basic desktop will show a welcome screen, a desktop folder view widget, a tool box at the top right of the screen and a standard KDE panel at the bottom of the screen with a little touch from SolydXK developers.


The Welcome Window
The welcome window contains a welcome screen and a following menu items:

Drivers - To access Device Driver Manager, helps user to install correct driver for the machine hardware.

Community - Quick link to the SolydXK Homepage, Forums, Tutorials and Chat Rooms.

Contribute - Quick link to "contribute" sub-menu page to help make SolydXK better.

The Desktop Folder Widget
The desktop folder widget shows the content of ~/desktop directory. Any file or folder placed in the desktop directory will be shown in this widget view.


Right-Click Context Menu
Right clicking anywhere on the empty area of the desktop will show a menu pop up which could be used to change desktop settings and appearance and several other menu as shown in the picture.


Tool Box
this Tool Box is located at the top right of the desktop and if it's clicked, it will show a simplified menu of right click context menu.

The menu shown from Tool Box.


Panel

The basic panel contains:
an application launcher - just like a start menu programs on Windows.
a show desktop icon - show the desktop immediately.
a pager - to set up your virtual desktop and switching between desktops.
a task manager - a taskbar used to launch and monitor running applications.
a notification area - displays icons for system and program features that have no presence on the desktop.

A short description of the icon will pop up if the mouse pointer is hovered on the panel icon.


The Search Dialog Box
A search dialog box will pop up with the combination of alt+F2 key. Just type what you are searching; a part or full name of either a program or a file, and a list of result which corresponds to your query will be shown.

Thursday, April 4, 2013

How to Install SolydXK SolydK Flavour

To install SolydXK distro dual booting or maybe more with another operating system, it is explained here. This time, we will try to install SolydK as a single operating system on a machine.

The first step is obviously to download the SolydK .iso from the official web SolydXK and burn it into DVD media and then boot it from your machine.

Boot welcome screen, select start SolydK to run it as a live DVD.

The OS is preparing to run.
The desktop environment first runs. Click the Install SolydK icon to start the installation wizard.
Select language.
Select timezone.
Select the keyboard layout.
Input your name, username, password and host name.
The drive list, just click forward.
SolydK automatically proposes the composition of the partition needed to install the operating system. 

As seen in this picture, we replace another OS to SolydK. Right click the device with ext4 type and select assign to / .

For a better explanation how to partition the harddisk, we can refer to the installation of SolydX here.
Mark the install GRUB and click forward.
The summary of the installation setup.
The SolydK installation is in progress. This will take a while.
Restart the computer and reboot into the new system.
And welcome to the SolydK with KDE Plasma Desktop. 

Wednesday, April 3, 2013

Integrate Dropbox to Thunar XFCE

To integrate Dropbox into Thunar file manager for XFCE, we need the .deb extension that luckily Crunchbang has provide in their repositories.

The download link :
thunar-dropbox-plugin_0.2.0-1_i386.deb (32 bit)
thunar-dropbox-plugin_0.2.0-1_amd64.deb (64 bit)

Just click the file downloaded to install it using gdebi package manager.

The information about the package.

The installation process.
Close and restart the machine.


And we get the dropbox integrated at the right click menu of thunar file manager.
note : dropbox needs to be run for the dropbox context menu to show up.


Install Dropbox on SolydX

Dropbox is a cloud storage that let you synchronize files or folders anywhere on any device as long as you are connected to the internet.

If you don't have any Dropbox account yet, you should try it here (and kindly using my referral).

To install Dropbox, first go to the official Dropbox website to download the .deb file here


Download the .deb files
Click the downloaded .deb files to open it with gdebi package installer.
The installation process is finished.
Run the dropbox installer.
The dropbox installation wizard will open. Click ok to continue.
The wizard will download the necessary files.
If you have registered from the link above, select i already have a Dropbox account and then click next.
Fill in the email and password for your Dropbox account and click next.
Select the preferred type of account and click next.
Choose the advanced to have the Dropbox folder at separated partition so it is saved just in case you ever need to reinstall the operating system.

To set up the separated partition, follow the step by step mentioned at this post.
Since i already have a Dropbox folder, a warning dialog box will appear. Just click ok.

If you don't have any dropbox folder before, no warning dialog box would open.
Choose whether you want to sync all folder or just  selective folder.
And the setup process is done. Welcome to Dropbox!